Monday, January 30, 2012

Yummy In Your Tummy Cookies

This is the best recipe for chocolate chip cookies, hands down! 
Not too sweet, not too bland.  A little crispy on the outside and chewy in the middle. Impressive, right ? Here is the recipe from my kitchen to yours. 
Your welcome :)


TIPS & TRICKS
Here is a baking soda comparison. Same recipe for both batches.The bottom one I added a quarter teaspoon more of baking soda. Both were delicious. 


"Baking Soda. Helping yumminess rise to the occasion"
 ~ Home Spun Journey (c)2012 


7 Steps. 9 Ingredients. Pre heat oven to 375 F

1 cup butter or margarine.
1 cup white sugar.
1/2 cup brown sugar.
2 eggs.
2 teaspoon vanilla
2 & 1/3 cups all purpose flour.
1 teaspoon salt.
1 teaspoon baking soda.
12 oz chocolate chips. 

1)Creme together sugars and butter
2)Add eggs, vanilla, salt and soda.
3)Add flour 1 cup at a time, then 1/3 cup.
4)Add chocolate chips.
6)Drop from teaspoons on ungreased cookie sheet.
7)Bake at 375 for 8-10 min.

Makes almost 3 dozen.

TIPS & TRICKS 

~Feel free to add a little coconut, cinnamon, or nuts. Just eyeball it.  
~If you shave a chocolate bar into it, you will end up with double chocolate/chocolate chip cookies ;) 
   ~If you forget to set the timer, don't fret. They will be done when you can smell the yumminess  wafting from your kitchen and they are golden.

Happy baking!


Sock Bun Tutorial


Have you tried the sock bun, yet?!  Oh my goodness! It has made my life so much easier! Especially when it comes to my daughter being in ballet. No bobby pins required. (That in it self is a blessing).


Here is the video tutorial that taught me just how easy it really is:


Click here for the Sock Bun Video


And here are my photos of my own Sock Bun Success! 


Happy Stylin', Everyone! 

Sunday, January 29, 2012

Yummy In Your Tummy Banana Bread

It was a "baking kind of weekend" in our house hold, boyfriend and lil one included. 


We made home made banana bread, twice baked potatoes, home made mozza-sticks, and home made chocolate chip cookies ! Let me tell you, our home smelled amazing all weekend long! 


I thought I would share my Banana Bread recipe with you first, because it is such a favorite with us and the entire loaf is half gone in one day between the 3 of us! Ha!


8 Ingredients.   11 Steps.   Pre Set Oven to 350 F  


1 cup butter or margarine. 
2 cups granulated sugar.
4 eggs.
6 extra ripe bananas.
2 teaspoon baking soda.
1 tablespoon salt.
2 cups all-purpose flour.
1/2 cup macadamia nuts (optional).


~In a large bowl, creme together the sugar & butter well until a light lemon color. Mash bananas in a separate bowl. And whisk the eggs in a smaller bowl.


~Then add the squashed bananas and eggs to the mixture.


~Stir well until all the ingredients are completely mixed.


~Sift together the flour, soda, and salt. Add to the wet ingredients.  Add nuts if desired.


~Again, mix well. But, do not mix too much ;)


~Pour batter into two separate bread pans (grease them with Crisco or margarine or butter so they do not stick).


~Bake for 45 min.


TIPS & TRICKS 


~ Use a tooth pick or a fork to carefully pierce the loaf.  If batter sticks to it when you lift it out, it is not done, yet.
~Don't be scared! You can add anything ! Such as; 
lemon zest, orange zest, chopped nuts, chocolate chips, chopped apricot, chopped mango, coconut flakes, mince meat....(maybe not all at once) Have fun! 
~If you happen to somehow mess up the temperature, don't fret. Cover your loafs with tin foil (tent it like you would a turkey) and cook the remaining amount of time. Check it every now and again. It WILL turn out. 
~If you happen to pour the entire contents of the batter into one pan, never fear! Double your cooking time. (so, 90 min) and be sure to watch the top. When it is happy and golden- that is when you want to tent it and bake for the remaining amount of time. 


This is the best recipe I have found for Banana Bread. It is easy, moist, not too sweet, and full of flavor, versatile and virtually fail-proof!


I promise you it is not burnt! I curse my tablet's camera for it's inaccuracy of color definition. 
Happy Baking, Everyone! 


Sunday, January 8, 2012

Mod-Podge Step Stool


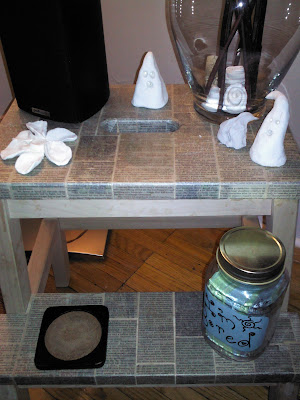
This past summer I had bought a second hand step stool off of Kijiji and decided to use it as an end table. Before doing this, I decided it needed some extra character. Using what I had around our home, my creative wim landed on the idea of mod-podge and newspaper. After some research, I quickly learned of three DIY mod podge recipes. The three variations are as follows: One using flour, One using Elmer's glue and another using the stove top cook method. I used option A for my step stool. But,I love all three, they work fantastic!
Option A
you will need:   A Jar, Elmer's Glue, Water        
Squeeze the glue into your jar.  Then the water. You want it to be equal parts. Shake, shake, shake! Done! This is the one I used for my step-stool.
Option B                      
The Italian method of decoupage is known as "lacca povera".  It
You will need:  A Jar, Flour, Water, Stove (or boiling water from a kettle).        
Consists of 1 part flour to 5 parts water, boil 3 min and let cool. If you live in humid area, you will need less water (1/4 less). Dries very smooth.
Option C                       
You will need:  Flour, Water, Jar          
1 Part Flour. 1 Part Water. Mix in the jar to avoid a mess.  Shake! Or, If you plan on using it right away, stir together in a large bowl.  Easy peezey lemon squeeze-y!


There you have it! All three options are also used for paper mache. Did you know that? So save your self a buck and make your own instead of buying name brand Mod-Podge. If you are doing paper mache, do not overlap more than 4 layers of paper, as it will not dry properly. Kids in school typically do two layers, as they tend to over lap more ;) *giggles.


If you want a touch of extra shine, go ahead and add some varnish. Make sure the can says Non-Yellowing! 


Love it or Hate it? 


Thursday, January 5, 2012

A Post Xmas Christmas Post

DIY Gifts...Love 'em or Hate 'em ?
 This Xmas season I really embraced the DIY world and  fell privy to the abundance of home-made gift ideas that are spinning around the web.  I wanted  to share a pic with you(post Xmas) to inspire you for next year or upcoming events.  It saved us a ton of money, and we were able to spread the love with adorable home made gifts!  Did you follow this DIY trend, also? 
Post a comment, we would love to hear from you!  Thanks for stopping by! :)  


Contents: Chocolates, Green tea, Chai Tea, Earl Grey (6 wrapped in twine), Hot Chocolate
I used what was in our cupboards at the time. We gave this to our daughter's crossing guard :) 


Monday, January 2, 2012

Twisted


Hi Y'all !Pin It
I have been trying to find more ways to organize our home, without spending much, if anything at all. One issue that I have been having is finding shirts I hang up, on the floor! But, there is NO way I would spend 5.00 dollars on a hanger with the pinchy things attached and the plastic hangers with the little groove in them just don't hold wide neck shirts, especially if they are moved around in the closet while I am trying to find something to wear. Wire hangers. I loath them. Everything about them is annoying. Until.... I came up with this idea:


.

You can wrap ribbon/yarn around the ends using a hot glue gun to make them more pretty if need be, or to avoid a funny poke mark on more delicate shirts.  
Hope you find this useful, please feel free to comment below! 


Sunday, January 1, 2012

Baking Soda Clay!

Happy New Year to Everyone! 2012, already! Can you believe it? Hope everyone arrived home safely. Did any of you access AAA for your free ride home? (The info was posted in my last blog post if I sound like a crazy lady, lol.) If you did, please comment below and tell us how that went! I think it's a fantastic FREE service that will save so many lives on New Years Eve. Anywhoo, upward and onward with today's post, shall we?
As promised, here are the photos of our creations with Baking Soda Clay.
So simple and incredibly cost effective and quick to make (7 min of your time).  Let's tally up the costs, shall we? (I posted the industrial size, but unless you want to entertain an army...lol...just look for a little box that looks exactly like these ones. Or scoop up the grocery store name brand for a little cheaper.)

Baking Soda 1.00                         Corn Starch $1.50
Arm & Hammer Fridge-n-Freezer Pack Baking Soda, Unscented, Powder

And drum roll, please...


Well, there you have it! I do have a tip for smoothing out any cracks if they form; Wet your finger tips and smooth over, or use the back of a spoon that is a little damp with water ;) I figured this out after we made the ghosts, and applied this technique to the roses.


Enjoy!
Pin It